Make a Felt Christmas Tree Skirt
Feeling a bit crafty during this holiday season? Want to put your personal touch on some easy, inexpensive decorative items? Trying to find a non-messy craft for the children? Look no further: felt is the material for you. Felt, made from fibers matted together, has been used functionally and decoratively since as early as the 7th century B.C.
Why felt?
When felt is cut, the edges will not unravel, making it perfect for crafting. Use felt to make a tree skirt, stockings, and ornaments. It is available in paper-size sheets at craft and fabric stores in a myriad of colors. Felt is also sold at fabric stores by-the-yard, measuring 36 or 72 inches across, in many basic colors. Your design can feature cut-outs with a second layer of felt underneath or felt shapes sewn, glued, or fused (iron-on) to a single layer.
 Holiday cookie cutters make great stencils and more detailed images can be found in clip art catalogs. Simple, repetitive shapes are very effective. For those who are more ambitious, many trims such as rickrack, sequins, buttons, and beads can be sewn on for dazzling details. If your well of creativity has run dry, look at felt holiday decorations from the 50’s and 60’s. Copy these retro designs or improve upon them with modern touches. Many home catalogs feature felt holiday items which can inspire you as well.
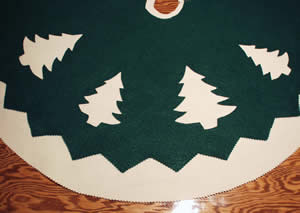
Instructions for Felt Tree Skirt with Cut-Out Design
1. Determine width for skirt. 54 inches is standard for a 6-foot tree.
2. For this size, buy 1 ¾ yards of felt, sold on the bolt with a 72 inch width. Purchase same amount of a second color.
3. Cut 27 inches of string and attach it to a fine-point permanent marker.
4. Lay out bottom color of felt on a flat surface. Holding free end of string in  the center of the felt, draw a circle with the marker. Repeat with other color, shortening string by 2-3 inches.
5. Draw a straight line from center of each circle to the edge and cut along line. Draw a 5 inch (diameter) circle in center of each and cut out.
6. Choose cut-out designs and make paper patterns. On wrong side (won’t be seen) of top felt circle, trace patterns with marker, spacing evenly. Cut out shapes.
7. If desired, cut edges of both felt circles with pinking shears (zig-zag edge). You can also cut triangles or half-circles on the edge for extra interest.
8. Place top circle, right side up, on bottom circle, matching openings in each and attach by sewing, with fabric glue, or with iron-on fusing.